White Spots on Cannabis Leaves: Causes and How to Fix Them
White spots on cannabis leaves can come from fungal growth, pest feeding, driedthe marks should be examined before anything is applied to the plant.
Powdery patches usually suggest mildew. Numerous pale pinpricks may indicate spider mites, while silvery streaks with black specks are more typical of thrips. Defined lesions, droplet-shaped marks, or bleached upper leaves point toward other causes.
White Spots on Cannabis Leaves at a Glance
| What the spots look like | Likely cause | Where to inspect | First step |
|---|---|---|---|
| White, powdery circles or patches | Powdery mildew | Leaf surfaces, petioles, stems, and flowers | Separate the plant and check nearby foliage |
| Many tiny white or yellow dots | Spider mites | Leaf undersides | Look for mites, eggs, cast skins, and webbing |
| Silvery flecks or irregular streaks | Thrips | Veins, young leaves, and leaf undersides | Check for narrow insects and dark fecal spots |
| Frosty, evenly distributed crystals | Healthy trichomes | Sugar leaves near developing flowers | Inspect the structures under magnification |
| Gray or tan spots with dark margins | Leaf-spot disease | Older leaves and humid parts of the canopy | Track whether the lesions are expanding |
| Round marks following dried droplets | Water or spray residue | Surfaces exposed to misting | Review recent foliar applications |
| White or pale tissue near the grow light | Light stress or sunscald | The highest or most exposed leaves | Check light intensity and canopy temperature |
How to Inspect the Spots
Examine several leaves from different parts of the plant. A single mark may not show the full pattern, especially during the early stages of a pest or disease problem.
Use a hand lens or a phone camera with a macro setting to inspect both sides of each leaf. Note whether the white material sits on top of the surface or whether the tissue itself has lost color.
Also look for:
- Fine webbing between leaves or around stems
- Moving dots, narrow insects, eggs, or shed skins
- Black specks beside damaged tissue
- Yellow halos or dark borders around lesions
- Leaf curling, brittleness, or distorted new growth
- A pattern limited to the upper canopy
Photograph the affected areas and compare them over the next day or two. An expanding fungal patch or increasing pest damage behaves differently from a fixed mineral deposit.
Powdery Mildew
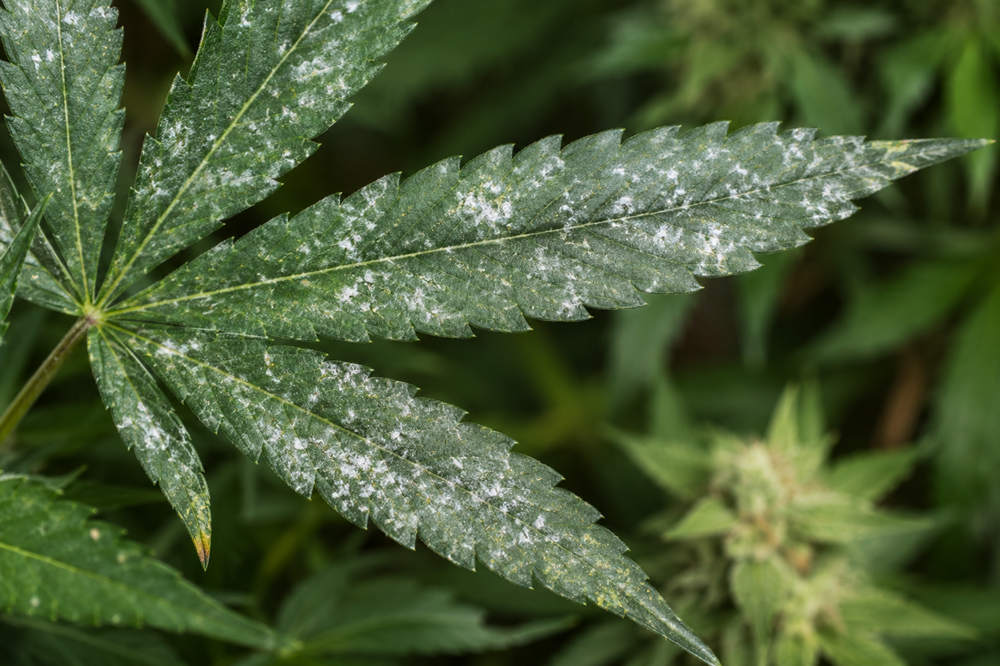
Powdery mildew commonly appears as small white circles that resemble flour scattered across a leaf. The patches may gradually enlarge and merge until much of the surface is covered.
The fungus can develop on leaves, petioles, stems, and flowers. As an infection advances, affected foliage may yellow, dry out, and fall.
Warm temperatures, high humidity, dense foliage, and weak air circulation favor its development. Powdery mildew does not require visibly wet leaves. It can spread while the foliage appears dry, particularly when humid air remains trapped inside a crowded canopy.
Overwatering may contribute indirectly by raising humidity and keeping the growing area damp. Plants packed closely together also create small stagnant zones that may not be reflected accurately by a room-level humidity sensor.
How to Address Powdery Mildew
Remove badly infected leaves carefully and avoid shaking spores across the rest of the canopy. When growth has spread extensively or reached developing flowers, retaining the plant may present a greater contamination risk than removing it.
Correct the conditions that allowed the infection to develop. Reduce persistent humidity, improve airflow through the canopy, provide adequate space between plants, and allow the growing medium to dry appropriately between irrigations.
Current cannabis pest-management guidance emphasizes infected-plant removal, equipment sanitation, humidity reduction, and moisture management.
Spider Mites
Spider mites feed by piercing individual plant cells. The resulting damage appears as numerous pale white or yellow dots known as stippling.
Early stippling can resemble dust or fine spray residue from a distance. As feeding continues, the pale dots may merge into larger yellow, whitish, or bronze areas. Severely damaged leaves can become dry and drop prematurely.
Most mites feed on the undersides of leaves. Under magnification, adults may look like tiny moving dots. Eggs, pale cast skins, and delicate webbing can also appear beneath the foliage. Webbing is generally more noticeable once the infestation is established.
The combination of stippling and webbing is a strong indication of spider mites. The University of California IPM guidance on spider mites recommends inspecting leaf undersides whenever white spotting or webbing appears.
How to Address Spider Mites
Remove leaves that are heavily colonized and inspect neighboring plants closely. Focus on the undersides of lower and interior leaves, where small populations may remain hidden.
Spider-mite management may involve biological controls, physical removal, or crop-approved products, depending on the cultivation system and plant stage. Warm, dry conditions can allow populations to increase quickly, so continue inspecting new growth even after the visible damage slows.
Thrips
Thrips damage usually looks scraped, silvery, or streaked rather than powdery. Their feeding can leave white flecks along the veins, irregular silver patches, and distorted young leaves.
Tiny black fecal deposits near the scars provide another useful clue. The insects themselves are narrow and may move quickly when disturbed.
Hold a sheet of white paper beneath a branch and tap the foliage gently. Any thrips that fall onto the paper will be easier to see. A hand lens can help distinguish the slender insects from rounder mites.
Hemp-specific thrips guidance from Utah State University identifies white flecks, silvery scars, dark fecal spots, and damage near leaf veins as common signs.
How to Address Thrips
Remove badly damaged material and inspect incoming clones or plants before allowing them near the main crop. Weeds and unnecessary vegetation around the cultivation area may also provide alternative hosts.
Blue or yellow sticky cards can help detect flying adults and show whether the population is increasing. They are monitoring tools rather than a complete treatment.
Biological controls or legally permitted products may be appropriate in some growing systems. The best choice depends on the crop stage, local regulations, and whether flowers are already developing.
Healthy Trichomes
Not every white or frosty surface is a problem. Cannabis flowers and nearby sugar leaves naturally develop glandular trichomes that produce and store cannabinoids and terpenes.
Under magnification, trichomes appear as organized hair-like or mushroom-shaped structures with small glandular heads. Powdery mildew instead forms irregular patches across the surface without the same repeated structure.
Healthy trichomes are usually concentrated around flowering tissue and follow a relatively even distribution. They do not spread outward in circular colonies or cause the leaf beneath them to yellow.
A scientific review of cannabis glandular trichomes describes them as the plant structures responsible for producing many of the compounds associated with cannabis resin.
Cannabis Leaf-Spot Diseases
Leaf-spot diseases damage the tissue itself rather than creating a loose coating. Cercospora can produce gray or tan lesions with dark brown edges. Septoria commonly begins as small brown spots surrounded by bright yellow halos, often on older leaves in humid parts of the canopy.
As the lesions expand, they may merge into irregular blotches. Entire leaves can eventually yellow and fall.
These defined margins and dead centers help distinguish leaf spots from powdery mildew. However, different pathogens and environmental problems can create similar symptoms, so laboratory diagnosis may be necessary when lesions keep spreading.
The Utah State University hemp leaf-spot guide provides visual descriptions of Cercospora and Septoria symptoms.
Water and Spray Residue
Hard-water minerals, dried nutrient solution, and foliar products can leave white marks on exposed leaves. The residue often follows the circular outline of a droplet or appears as a splash pattern.
This is more likely when the marks appeared shortly after misting or overhead watering and remain unchanged over several days. Leaves hidden from the spray may remain clean.
Review recent foliar applications and water quality before treating the plant for a disease. Avoid frequent misting during flowering, since unnecessary moisture around dense flowers can increase contamination risks.
Light Stress or Sunscald
Excessive light exposure can bleach the parts of a plant receiving the strongest intensity. The highest leaves or the side facing a grow light may turn pale yellow or white, while shaded leaves remain unaffected.
Severe damage can become tan, dry, papery, or brittle. Unlike mildew, the affected area will not have a loose powdery texture. It also will not be accompanied by mites, webbing, or insect fecal spots.
Check whether the problem appeared after lowering a light, increasing its intensity, moving plants outdoors, or removing foliage that previously shaded the affected area.
Increase the distance from the light or reduce its intensity gradually. Correcting several environmental factors at once can make it harder to determine which change solved the problem.
Nutrient and Root-Zone Problems
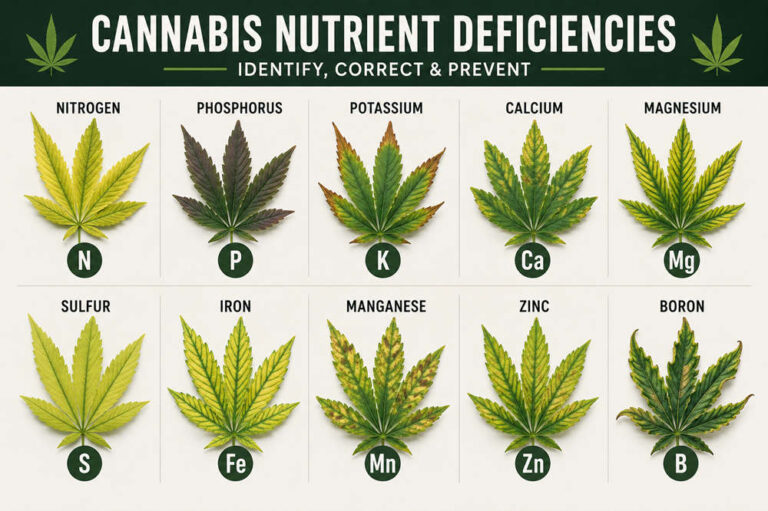
Nutrient problems are less likely to produce distinct white spots on the leaf surface. They more often cause patterned yellowing, pale areas between veins, discolored margins, rusty lesions, or general loss of color.
Consider root-zone pH, nutrient availability, salt accumulation, and root health only after ruling out mildew, pests, residue, light exposure, and defined leaf lesions.
What to Do Immediately After Finding White Spots
- Separate the affected plant. Keep it away from healthy plants until contagious pests or diseases have been ruled out.
- Inspect both sides of the leaves. Use magnification to look for fungal growth, insects, eggs, cast skins, webbing, and fecal spots.
- Check the entire plant. Examine stems, petioles, lower leaves, new growth, and developing flowers.
- Record the symptoms. Photograph the spots and monitor whether they expand, multiply, or remain unchanged.
- Remove heavily affected material. Place it directly into a bag rather than carrying uncovered leaves through the growing area.
- Clean tools and surfaces. Sanitize scissors between plants and remove fallen foliage from the floor.
- Review the environment. Check humidity, airflow, irrigation, canopy density, light intensity, and temperature.
- Confirm the diagnosis. Avoid applying several unrelated treatments to an unidentified problem.
Use only products that are legally permitted for cannabis or the applicable crop category in your jurisdiction. The pesticide label defines how a product may be safely and legally used, and state cannabis rules may impose additional restrictions.
How to Prevent White Spots From Returning
- Inspect the undersides of leaves regularly with magnification.
- Quarantine new plants and clones before introducing them to the main crop.
- Maintain airflow through and around the canopy.
- Prevent dense foliage from creating humid, stagnant pockets.
- Clean pruning tools between plants.
- Remove fallen leaves and growing debris promptly.
- Avoid unnecessary foliar spraying, particularly during flowering.
- Use sticky cards to monitor flying pests such as thrips.
- Check plants after changing lights, irrigation, or ventilation equipment.
- Keep records of pest sightings and environmental conditions.
Regular inspection is more effective than waiting for obvious damage. Powdery mildew, mites, and thrips are all easier to manage before they spread across multiple plants.
Can Leaves With White Spots Recover?
Surface residue may be removed without permanent damage, but most injuries inside the leaf will remain visible. Spider-mite stippling, thrips scars, dead leaf-spot lesions, and light bleaching do not turn green again because the affected cells have already been damaged.
Recovery should be judged by the appearance of new growth and whether the symptoms have stopped spreading. A damaged leaf may remain marked even after the original problem has been controlled.
Use particular caution when fungal growth reaches cannabis flowers. A review of fungal and mycotoxin contamination in cannabis and hemp flowers found potential health concerns, especially for immunocompromised consumers.
Flowers with visible mold should be discarded rather than washed, trimmed, or otherwise salvaged for consumption.
Final Thoughts
The pattern of the white spots usually provides the best diagnostic clue. Powdery patches suggest mildew. Tiny dots with webbing point toward spider mites. Silvery scars and black specks are more consistent with thrips, while evenly distributed crystals around flowers may simply be healthy trichomes.
Fixed lesions, droplet patterns, or bleached upper leaves call for a closer look at disease, residue, and growing conditions. Inspect the plant carefully, contain any possible spread, and confirm the cause before choosing a treatment.